【翻译】Core Animation 3D 绘图(下)

这是关于 Core Animation 三维绘图的翻译文第二篇(共两篇),这里会承接上一篇的内容,把之前的成果与手势控制结合起来,完成了一个很有趣的效果,原文是 Think & Build 上的 Introduction to 3D drawing in core animation(Part 2)。想看最终成品可以去原文作者的 Github 上看这个地方,把源码下载回来自己跑一下。

因为翻译这篇文章的时间已经比较久远了,难免有一些错误的地方,欢迎大家指出来共同进步。

在上一篇文章中,我们已经学到了用 Core Animation 来绘制三维图的基础。在接下来的这一部分,我们会用到更深入的技巧,去创造一个交互视图。我们会做一个像行李输送带那样的东西,让用户可以通过手势交互来控制它。

“传送带”概览

先来挖掘一下这个效果的设计,好让我们清楚怎么去分解它。

三维的!

首先,我们可以猜到需要用透视图来实现整个画面。因为从用户的角度去看,远方的卡片是立体的。所以,我们会创建一个三维层次(3D hierarchy),正如上一篇文章所描述的那样,使用一个 CATransformLayer 来作为根视图。

卡片们

这个传送带由许多卡片(原文是 Plane,暂且这么叫吧)组成。我们会用一个 CAGradientLayer 来表示这些对象。这是 CALayer 的一个子类,不同的是我们可以用一个渐变色来作为它的背景色,而不是常见的单一色彩。

这些卡片会绕着一个圆心做圆周运动,并且带有旋转的效果。(想象一下机场行李输送带的样子)。

手势(Gesture)

监听用户的手势操作比较简单,使用一个 Gesture Recognizer 就可以了。
我们要做的就只是跟踪用户的操作,把获取的数据转化为可以用来表示传送带旋转角度的数值。

好,有了一定的“全局观”之后,我们就可以来耍耍了。启动神圣的 Xcode!

代码敲起来!

我们从第一个视图控制器的 viewDidLoad 开始:

1
2
3
4
5
6
7
8
9
10
11
12
13
14
15
16
17
18
19
20
21
22
23
24
25
26
- (void)viewDidLoad
{
[super viewDidLoad];

//Initialize the TransformLayer
transformLayer = [CATransformLayer layer];
transformLayer.frame = self.view.bounds;
[self.view.layer addSublayer:transformLayer];

angle = 0;
XPanOffset = 0;

//Create 5 planes
[self addPlane];
[self addPlane];
[self addPlane];
[self addPlane];
[self addPlane];

//Force the first animation to set the planes in place
[self animate];

//Initialize the Pan gesture recognizer
UIPanGestureRecognizer *panGesture = [[UIPanGestureRecognizer alloc]initWithTarget:self action:@selector(pan:)];
[self.view addGestureRecognizer:panGesture];
}

完成!因为这是主干部分,所以只管读下去,看到分解的细枝末节之后,这里的代码自然就理解了。

现在我们清楚知道的是,这里创建了一个 CATransformLayer 的对象(transformLayer)来作为根图层;然后我们用 addPlane 这个方法往根图层里面加入了5张卡片;最后我们用 -[panGesture:] 方法来统一管理所有的 Pan 手势。

把卡片先画出来

-[addPlane] 这个方法很直白了。它只是用来创建一个 CAGradientLayer 并且给它加上一些属性,然后把这个图层作为子图层,插入到 transformLayer 里面去。

1
2
3
4
5
6
7
8
9
10
11
12
13
14
15
16
17
18
19
20
21
22
23
24
25
26
27
28
29
30
31
32
33
34
35
36
37
38
/** A simple function to create a CAGradientLayer **/
- (void)addPlane {

CGSize planeSize = CGSizeMake(250, 150);

//Initialize the layer
CAGradientLayer *layer = [CAGradientLayer layer];

//Set the frame and the anchorPoint
layer.frame = CGRectMake(480/2 - planeSize.width/2, 320/2 - planeSize.height/2 -20, planeSize.width, planeSize.height);
layer.anchorPoint = CGPointMake(0.5, 0.5);

//Set borders and cornerRadius
layer.borderColor = [[UIColor colorWithWhite:1.0 alpha:0.3]CGColor];
layer.cornerRadius = 10;
layer.borderWidth = 4;

//Set the gradient color for the plane background
layer.colors = [NSArray arrayWithObjects:
(id)[UIColor purpleColor].CGColor,
(id)[UIColor redColor].CGColor,
nil];
layer.locations = [NSArray arrayWithObjects:
[NSNumber numberWithFloat:0.0f],
[NSNumber numberWithFloat:1.0f],
nil];

//Set the shadow
layer.shadowColor = [[UIColor blackColor]CGColor];
layer.shadowOpacity = 1;
layer.shadowRadius = 20;

//The double side has to be setted if we want to see the plane when its face is turned back
layer.doubleSided = YES;

//Add the plane to the transformLayer
[transformLayer addSublayer:layer];
}

唯一需要费点口舌的是 doubleSide 属性。把它设置为 YES,就是告诉这个对象:“嘿,把你的背面也给我涂上颜色。”所以当卡片绕着 Y 轴旋转到接近 180 度的时候,我们还是可以看到它(不然就只能看到一个黑色的东西,要是正巧背景也是黑色的话,就什么都看不到了)。
为了更好的理解这句话的意思,来看看如果 doubleSideNO 的话,会看到什么。
double_side

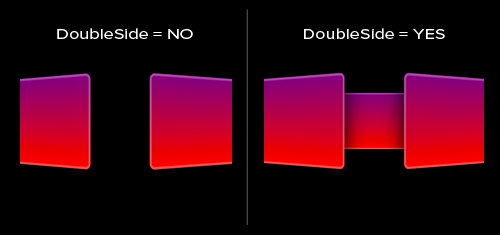
瞧,那个背对着我们的卡片的背面是全黑的(压根就没有被画出来)。

你可能已经注意到了,在 viewDidLoad 里面,我们加入了5张卡片,但是我没有给这些卡片一个指定的位置。它们只是按照在 -[addPlane] 方法中规定的 frame ,把自己在同一个位置上创建了出来而已。

给卡片们定个位

在 viewDidLoad 里面,紧跟在卡片的创建之后,我们调用了一个方法:-[animate]
这个方法的主要功能就是更新卡片的位置。我们第一次调用 -[animate] 的时候,触摸事件还没有被触发,所以它目的就只是把卡片排列好,形成一个传送带的样子。

现在来看看这个方法的代码:

1
2
3
4
5
6
7
8
9
10
11
12
13
14
15
16
17
18
19
20
21
22
23
24
25
26
27
28
29
30
/** This function performs the transformation on each plane **/
- (void)animate {

//Define the degree needed for each plane to create a circle
float degForPlane = 360 / [[transformLayer sublayers] count];

//The current angle offset (initially it is 0... it will change through the pan function)
float degX = angle;

for (CALayer *layer in [transformLayer sublayers]) {
//Create the Matrix identity
CATransform3D t = CATransform3DIdentity;
//Setup the perspective modifying the matrix elementat [3][4]
t.m34 = 1.0f / - 1000.0f;

//Perform rotate on the matrix identity
t = CATransform3DRotate(t, degToRad(degX), 0.0f, 1.0f, 0.0f);

//Perform translate on the current transform matrix (identity + rotate)
t = CATransform3DTranslate(t, 0.0f, 0.0f, 250.0f);

//Avoid animations
[CATransaction setAnimationDuration:0.0];

//apply the transoform on the current layer
layer.transform = t;

//Add the degree needed for the next plane
degX += degForPlane;
}

defForPlane 的变量表示每张卡片要旋转的角度,它是通过上一张卡片的状态计算出来的,最终会构成一个 360 度的圆。从卡片的上方往下看应该是这个样子的:
planes_circle

在圆周里的 5 张卡片,每一张都要旋转一定的角度。这个角度是一个从 0 开始,每次增加(360/卡片数目)的值。

我们先让 angle 这个变量暂时为零,后面再来说它。

-[animate] 方法会在 transformLayer 的每一个子图层上面调用,也就是那五张卡片。
这个循环主要的作用是让每一张卡片都做出一定的变换:
首先是透视值,我们只是像上一篇文章做的那样,把 m34 设为某一个数值,好确保这些卡片会有一个三维的景深。
而另外两个变换就需要一点计算了。
我们已经讲过每张卡片需要旋转多少,但我们跳过了一个至关重要的地方。

如果我们只是让每张卡片旋转一下,就会看到这样的场景:
planes_center

所以我们还要让每张卡片作出一定的位移,这样才能把每张卡片放到正确的位置上面去。

最后一步就是把这些变换作用到卡片上,只要吧 transform 设置为我们计算出来的数值就好了。
degX 属性最后会加上一个 degForPlane,用来计算下一张卡片要旋转多少。

Pan Gesture

-[pan] 方法负责管理所有的 pan 手势。这个方法的代码长这样:

1
2
3
4
5
6
7
8
9
10
11
12
13
14
15
16
17
18
19
20
21
22
23
- (void)pan:(UIPanGestureRecognizer*)gesture {

//Get the current translation on the X
float xOffset = [gesture translationInView:self.view].x;

//When gesture begin, reset the offset
if(gesture.state == UIGestureRecognizerStateBegan) {
XPanOffset = 0;
}

//the distance covered since the last gesture event (I slow down a bit the final rotation multiplying by 0.5)
float movedBy = xOffset * 0.5 - XPanOffset;

//Calculate the offset from the previous gesture event
XPanOffset += movedBy;

//Add the offset to the current angle
angle += movedBy;

//Update the plane
[self animate];

}

pan 手势是持续性的,这意味着从截获到手势事件开始,pan 方法就会随着手指的移动而不断被调用,直到触摸屏幕的所有手指都抬了起来。

为了把这里面的信息转化为对我们的传送带动画有帮助的数据,我们要拿到 X 轴上的相对位移(相对于上一个位置)。
我们用变量 XPanOffset 来暂时保存位置。当手势改变的时候,更新 XPanOffset,加上一个相对位移的距离。这个距离保存在变量 movedBy 里面,最后会被加到变量 angle 上。
调用 -[animate] 方法的结果是,所有卡片都在随之旋转,并自转一个角度。

DONE!

总结

这只是个使用纯 Core Animation 构建三维视图的简单例子,项目中真实的需求可能要复杂得多,但是 Core Animation 的强大也不止于此。
现在你可以尽情去实验代码里玩耍了!

再一次附上原文:Introduction to 3D drawing in core animation (Part 2)